
Growing up in Canada, I always had a computer around the the house to tinker with. It started with a Macintosh Plus, followed by 486( DX2!). In my adult years, I usually had one tower I would keep alive just to tinker with. A computer to use as a home-server of sorts without the risk of nuking my main machine.
When I moved to the Philippines lugging a big tower over was out of the question for a few reasons.
1- Space. A 60 square meter (650 square foot) Condo doesn’t leave a lot of room to run a bulky PC tower and monitor.
2 – Power. Power in Manila is at least 3x more expensive than my native city of Vancouver. Running a PC all day just for hobby projects could mean another $750 to $1000 a year in power costs. No thanks.
3 – Cost. I wasn’t all that keen to build another tower, or pay to ship my existing ones over.
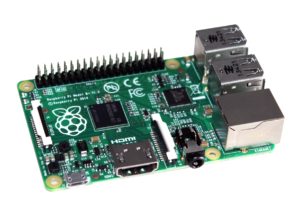
So needless to say when I heard about the raspberry pi a few years back, it piqued my interest. Its aimed at hobbyists. The mainboard is about the size of credit card, it runs on a low-power ARM CPU, runs a variant of Debian and costs about $35. Not bad!
I bought my first pi about 2 years ago, just as they announced the Pi 2 Model B. I’ve since used it for a number of fairly practical home projects that I’ll detail below. True Pi hackers be warned, these are pretty normal use cases. No home automation or spotify Jukeboxes here I’m afraid. Just boring sys-admin stuff. 😉
Project 1 – Netflix / Geo-unblocking
Around the time I got my Pi, netflix was still unavailable in the Philippines, so getting it into my living room required a bit of monkey work. Although netflix may be global now, there are services which allow you to pick any region you like, so you can swap to US Netflix content, or UK, Canada, etc. Pretty cool.

There are a number of services out there that can get around the geo-blocking. I wound up using a provider called Getflix. Getting getflix to work off the bat is pretty simple. Go go the website, and sign up. “Confirm” your current IP, and ensure the device you want to use has one of the Getflix DNS servers set. Simple enough.
However, there were two drawbacks to this sort of setup. One, devices would need to constantly switch DNS servers when they were coming / going from the house. Not exactly something I felt like doing each time I wanted to watch Netflix.
Second, with a home DSL connection, my IP would change and Getflix would stop working. The Getflix DNS servers are secured via IP. So each time my IP changed I needed to log into the Getflix website and update my IP. This wasn’t a major hassle (they actually provided a tokenized link to do it quickly), but still, the little things irritate me.
My goal was to automate all of this behaviour, so I could open netflix on any device on my home network without additional steps. Automating these two things turned out to be pretty simple.
First, I installed and configured BIND on my pi, using Google’s DNS as forwarders. Tutorial here.
Second, in /etc/bind/named.conf.options I added specific zones for netflix, HBOnow and any other services I wanted to use via Getflix like so:
zone "netflix.com" IN {
type forward;
forwarders {
54.251.190.247;
106.186.22.8;
};
};
zone "hbonow.com" IN {
type forward;
forwarders {
54.251.190.247;
106.186.22.8;
};
};
This effectively forwarded all lookups for netflix.com zones to Getflix instead of Google’s DNS. The end result? Any device on my wifi requesting netflix.com (or any of its subdomains) was pushed through Getflix to do its geo-unblocking magic. Not more static settings.
Overall, I do find using BIND as a home DNS server massive overkill, but DNSMasq and other simple DNS servers didn’t have the capability to forward lookups for a specific zone. So, there we are. ISP-grade DNS software running on my Pi so I can watch Netflix.
The next step is to update Getflix with my ever changing IP Address. Luckily this is pretty simple, Getflix has an API you can push to so a single line in my crontab could do the trick:
5 0 * * * root curl -u PUT_YOUR_API_KEY_HERE:x -X GET https://www.getflix.com.au/api/v1/addresses.json >/dev/null 2>&1
That’s it. Now whenever my IP changes, Getflix knows about it within 5 minutes. Seamless setup.
Project 2 – Fileserver
One thing I always loved about having a “home server” of sorts, was a central place to backup files and store large media. I had been manually doing this via a 2TB USB drive for the years prior to owning a pi. Turning this 2TB disk into a network fileserver was a simple process.
First I had to install NTFS-3G. Sadly my drive was formatted this way and I didn’t have any other place to dump 1.5TB of media so installing an NTFS driver was a necessity.
Next, I installed and configured Samba. SMB isn’t my favorite protocol, but it is by far the most common. I setup a permanent mount point in fstab for my USB disk, and configured samba to share it under a password protected account. Tutorial here.
Note: I found that the USB drive wouldn’t mount on boot sometimes, a common problem with USB drives on Pi’s. Adding rootdelay=5 to /boot/cmdline.txt gave it enough time for the drive to wake up and mount correctly.
All in all, probably only 20 minutes of work. The result? A fileserver accessible from any device on my home network.
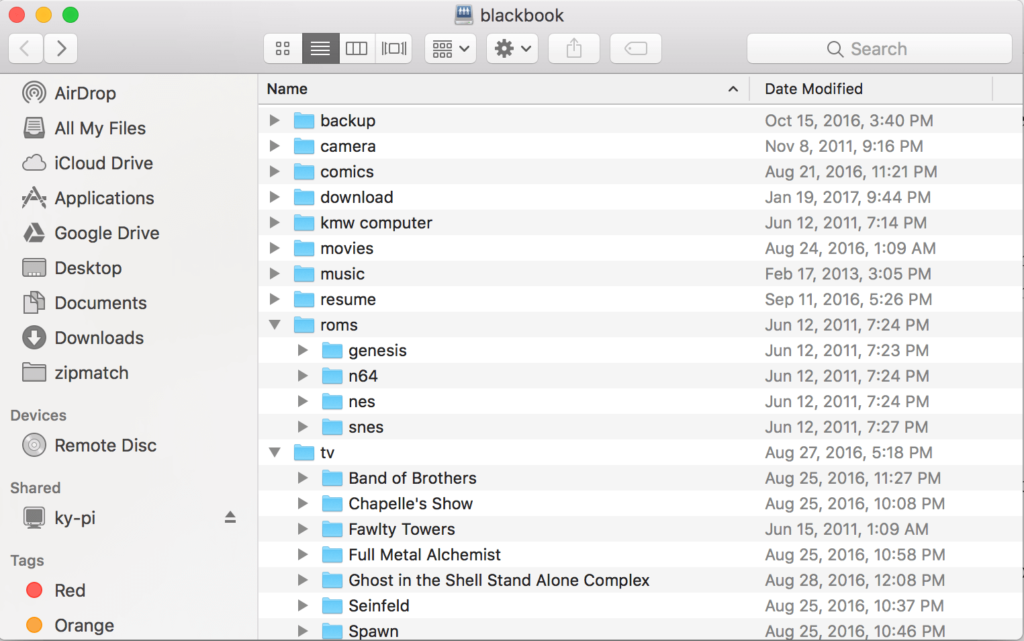
Recently, the app “FileExplorer” has made this setup especially useful as I can stream videos or open docs from my Fileserver to my iphone. Same with the VLC + Infuse on my apple TV. Now, all around the house classic Simpsons and Seinfeld episodes are just a few taps away.

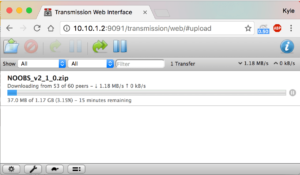
Project 3 – Torrent Server
Something I always really envied in the fancy QNAP NAS systems was the built in torrent server. Since I had a central place for media and a heft amount of disk space, running a torrent client on the Pi made sense.
My torrent client of choice Transmission has a linux version with web interface version that runs on Raspbian. Check out the Tutorial here.
Nothing here was too complicated, but I did need to apply a minor patch for some issues with the some of the interface. Not sure if this code made it into the mainline yet, but here it is just in case you run into the same issue: https://trac.transmissionbt.com/ticket/4987
So now, adding a torrent to Transmission is as simple as logging into the web interface and uploading a .torrent file, or even better: pasting a magnet link.
This was all fine and dandy, but I could only start downloads from home. What if I wanted to start a big download remotely, so it would be ready when I got back?
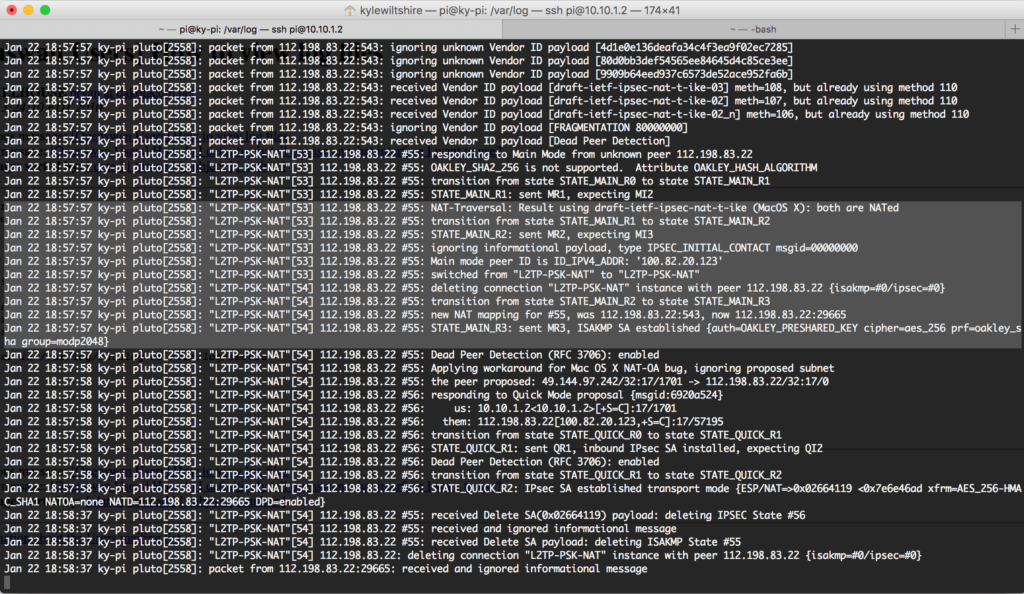
Project 4 – VPN, Dynamic DNS
What good is a torrent-enabled fileserver that only downloads if you are at home?
The Raspberry Pi makes a great little VPN server using LT2P over IPSec. This setup is a little more complicated than others, and involves changing some pretty important system files, so you may want to take a full backup before embarking on this project.
A recent, up to date guide to the setup can be found here. Note the issue with OpenSwan mentioned at the bottom. This had me stuck for a few days. Downgrading your Openswan version seems to be the only workaround for now.
All that’s needed from this point on is setting up the VPN client of your phone and laptop, and we’re in business. Now starting a torrent, grabbing a document from a fileserver or logging into my router are all easy things to do.
Assuming you are on a home connection without a static IP, the last step to tie this all together will be some form of dynamic DNS. My router supported this with DYN but required a whole bunch of suspicious sounding linksys-cloud login stuff. My Dynamic DNS Provider NO-IP wasn’t compatible anyways, so thats leaves us to configuring it on the Raspberry Pi.
If you aren’t afraid of some good old fashion compiling, setup and installation is pretty simple here.
The readme for the NOIP client suggests copying one of the relevant startup scripts (in this case debian.noip2.sh) to /etc/init.d but I couldn’t get the client to boot on startup. I wound up writing my own here:
#! /bin/sh
### BEGIN INIT INFO
# Provides:          noip2
# Required-Start:    $syslog
# Required-Stop:     $syslog
# Default-Start:     2 3 4 5
# Default-Stop:      0 1 6
# Short-Description: noip.com client service
### END INIT INFO
# . /lib/lsb/init-functions
case "$1" in
start)
echo "Starting noip2."
/usr/local/bin/noip2
;;
stop)
echo "Shutting down noip2."
killall noip2
#killproc /usr/local/bin/noip2
;;
*)
echo "Usage: $0 {start|stop}"
exit 1
esac
exit 0
As usual, make sure the script is executable and run “update-rc.d noip2 defaults” to build all the symlinks needed for launching.
Project 5 – Smokeping
I could write an entire blog post about how poor the internet connectivity is in the Philippines and the various reasons why. While the bandwidth may have improved in recent years ($80 USD gets me a whopping 14mbps) – Latency and packet loss can still be an issue, especially when traffic needs to head outside the Philippines. (many websites, online games etc.)
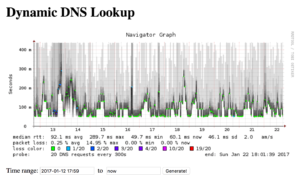
So, to keep tabs on my connections performance I use smokeping. It’s a piece of software which is definitely showing its age (written in perl, runs out of CGI), but the data it collects and the way it displays it is immensely helpful.
Smokeping can use ping, or any other service you configure to run tests against various network devices. Its a great tool for monitoring any sort of internet / WAN connection because it graphs the latency, packet loss and jitter / variance of these metrics in one. The deviation of ping responses are graphed as “smoke”, whereas the averages are the mid line, and the color represents packet loss.
A very useful tool for tracking and troubleshooting connections all in all.
Now, my past experience with setting up smokeping was not fun. There are few packages, and compiling all the various legacy perl libraries and getting them to play nice is a classic exercise in linux-library dependency hell. I was pleasantly surprised to learn however that there are smokeping packages on the Raspbian repository’s, so smokepings setup is pretty simple on a raspberry Pi.
Run “apt-get install smokeping” to install the service.
Then, edit your Targets file, located at /etc/smokeping/config.d/Targets
I configured mine like so. I have pings for my local router, google DNS, and google itself. I also run a regular DNS lookup to Google’s DNS to measure resolution times.
*** Targets ***
probe = FPing
menu = Top
title = KY-PI Smokeping Network Latency Monitor
remark = Welcome to the SmokePing website of  KMW. \
Here you will learn all about the latency of our network.
+ Local
menu = Local
title = Local Network
++ LocalMachine
menu = Local Machine
title = This host
host = localhost
#alerts = someloss
+ Routers
menu = Routers
title = Routers for local LAN
++ Router1
menu = 5E-Router
title = Main Router
host = 10.10.1.1
+ Internet
menu = Internet Services
title = Internet Accessbile Services
++ GoogleDNS
menu = GoogleDNS
title = Internet Latency to Google DNS
host = 8.8.8.8
++ Google
menu = Google.com
title = Latency to Google.com
host = www.google.com
++ DynamicDNS
menu = DynDNS
probe = DNS
title = Dynamic DNS Lookup
host = google.com
lookup = google.com
server = 8.8.8.8
To add a DNS probe, simple add the following to/etc/smokeping/config.d/Probes :
+ DNS
binary = /usr/bin/dig
Future Project – RetroPi

I’m a big emulator fan, and after reading about the RetroPi project and the recent release of the Pi Model 3, this looks like a great future project. I’ve got a new Raspberry Pi 3 on order, and an xbox 360 controller with USB receiver ready to go. Looking forward to classic SNES and PSX games soon.
I hear the Kodi media suite is pretty cool as well, and fits nicely with a Pi running RetroPi so adding that to the Pi 3 may provider some bonus HTPC benefits.
Conclusion
Running a (variant of) popular linux distro on an ARM chip gives you the feel for what these processors can and will do in the future.
The Pi has really made me appreciate how far the ARM architecture has come. We all run these processors every day in our phones, tablets and other mobile devices, but the software that powers these devices is so integrated and tied to the mobile ecosystem, its hard to appreciate whats under the hood.
The Pi makes a pretty great home server, and with a distribution based on debian its pretty easy to rig up existing tools to get things working. When I look back at all the various projects I’ve tinkered with, it may be the highest value electronics purchase I’ve ever made. Even with a fast SD card, a case and power adapter, you can put a Raspberry Pi together between $50 – $75. So if you’re a sys-admin type like myself, there is still plenty of uses for these babies. My recommendation is to pick one up and start hacking!
I am totally getting mine out of storage… 😉
Get a pi 3. 🙂
1.2ghz quad core stock. Apparently you can safely overclock by 150-200mhz if you have a heatsink / fans. People are turning those things into pretty sweet HTPC / Emulator setups.
Have tried Homebridge on RaspberryPI? Best homekit hub for non-homekit devices.
I haven’t, but when I move back to Canada I’ll check this out for sure. I want to play with home automation big time, but right now I rent, and its hard to find IoT devices in the Philippines.